
The set piece of the fallen tree began as a collaboration between Paul and I to complement the story of Dragon Age: The Dalish Curse, and to make a more memorable experience for the players. In previous RPGs our group has tried, including Serenity and Star Wars: Saga Edition, I tried to craft a story around three-dimensional elements (find the previous mega-picture posts for both Serenity and Star Wars posted earlier this week), including paper barns, houses, Reaver skiffs, and space ports.
After its release a year ago, Dragon Age: Origins quickly captivated me with its rich setting and deep story elements (not to mention a certain scantily-clad witch). I wanted to bring the same epic sense that I evoked in Serenity and Star Wars to the Dragon Age setting, and so, after asking Paul if I could make a set piece for the first story, he sent me this picture (after the break) alongside a single specification: the tree must be 8 inches in length across the ravine.

By far the best glue for paper and foam models, in my experience, is Scotch Quick-Dry Adhesive. It's slightly more expensive than alternatives, but its admirable adhesive strength and quick drying are worth it. After each side was raised, I added wire mesh to the board to form the ravine wall. I bent and twisted the metal to form a more natural look and stapled it onto the board before adding Gorilla Glue to all of the connection points to ensure a solid hold.


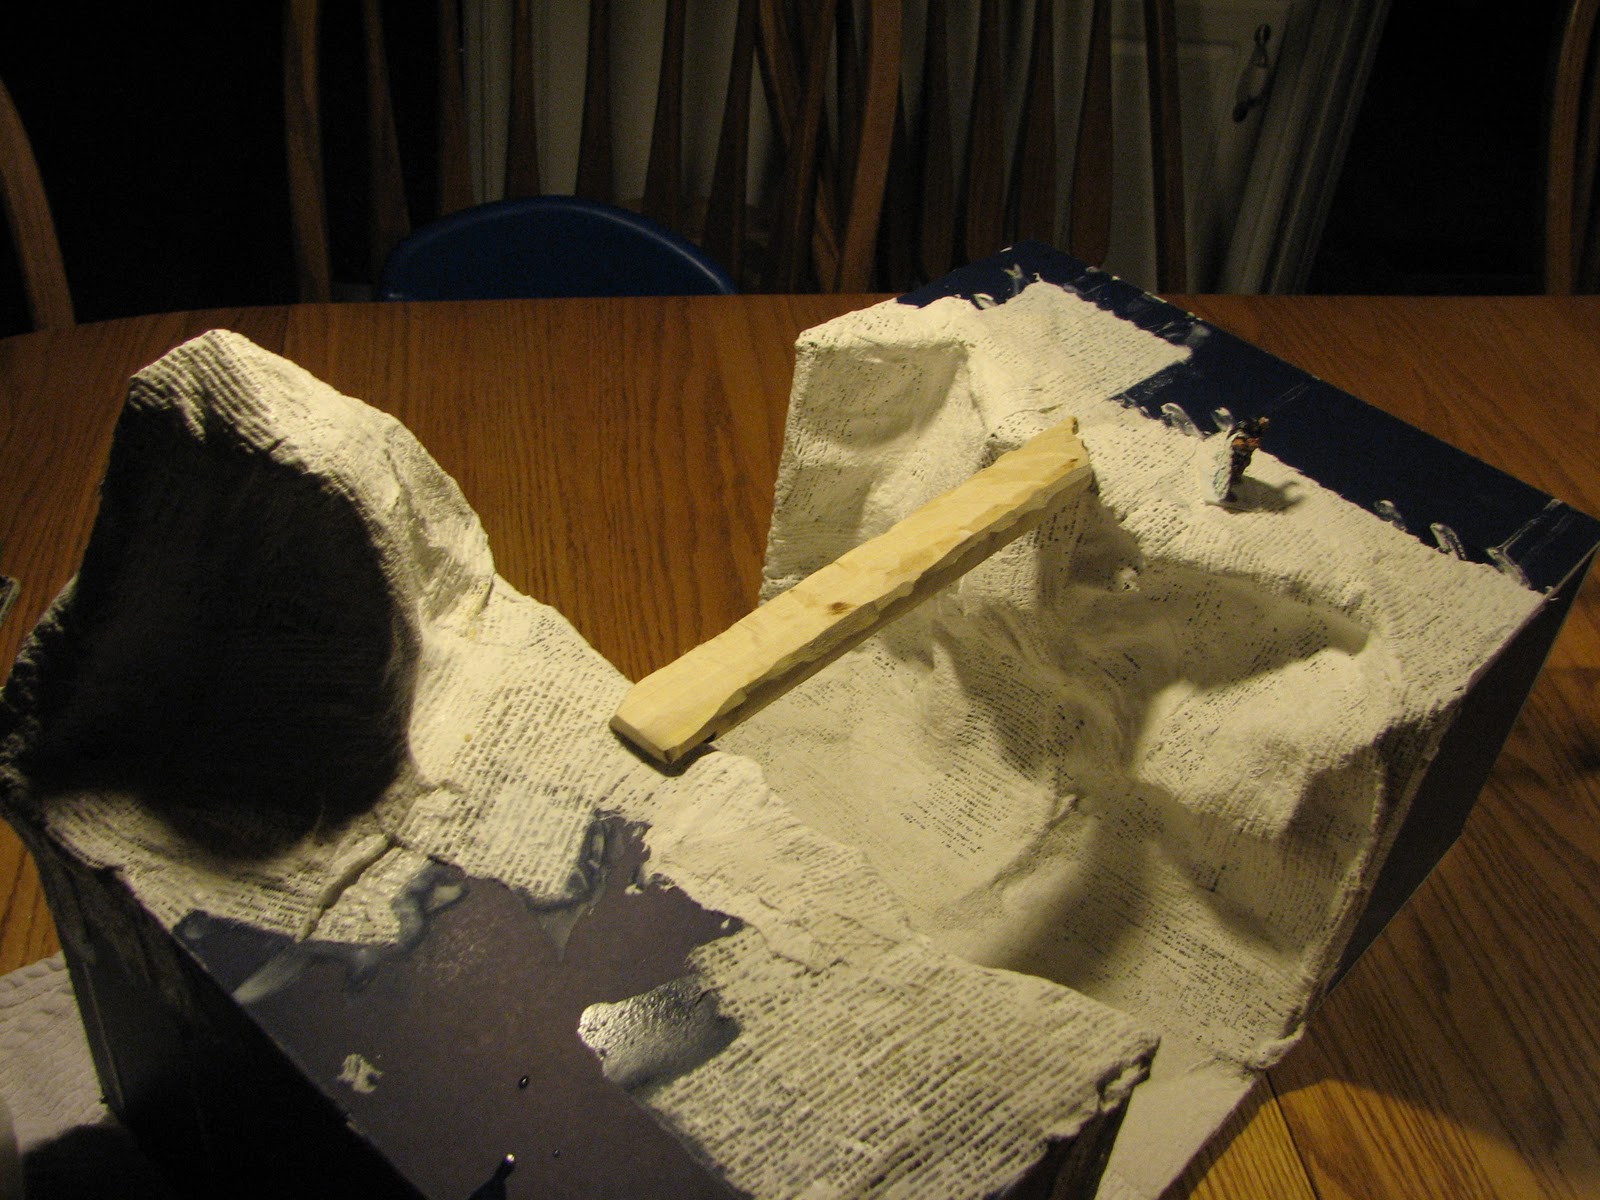
I then coated the wire mesh in plaster cloth (found at any local hobby store) and added the opposing ravine wall by the same method as the first. When cutting out the top piece, I left the ravine-ward side very jagged to appear more natural and less designed. After the second ravine wall was coated in plaster cloth, I added a small mountain on the top of one of the ravines to make each side visually distinct. First, I built up the support by using foam board with no exact measurement, and then added the wire mesh haphazardly before finishing it with plaster cloth.


With both sides of the ravine complete, it was time to construct the focal point of the encounter: the tree spanning the chasm. Since we play in 28mm scale, the tree would have to be at least one inch in width to accommodate the miniatures' bases. I stopped by the lumber store and picked up a foot-long, 1.25-inch diameter wooden dowel, which I cut down to 10 inches by table saw, leaving me one inch on either side of the ravine. I then shaved off a third of the dowel (table saw again) to give the miniatures a level surface to stand on. Lastly, I used a table grinder to nick and shave the sides to give it that authentic tree look.

With the ravine and tree completed, I set to work embellishing the piece with the details that would really give the piece character. I started by casting plaster molds of the rock face using a rock mold from the hobby shop. When casting plaster, I find mixing it in a aluminum pie pan makes for very simple cleanup afterward, because the pan can be twisted and the hardened plaster will break right off, making it easy to dump the remainder in the trash can. Never put plaster mix down your sink drain -- it will catch in the U-joint and harden in the water, making for a large mess or expensive bill later.

After approximately 25 castings, I began gluing the plaster onto the dried plaster cloth. Large pieces of rock molding were accented with smaller ones until the entire side was covered with plaster rock. Using a brush, I then painted fresh plaster into the cracks and gaps to give the wall a seamless appearance.

With the plaster finished, I glued the tree bridge in place across the ravine. Next, the piece de resistance: from the outset, I wanted to create the impression that the bottom was no mere 50-feet drop (in relative terms). Rather, I wanted the foreboding feeling of an unfathomable depth, so if you were careless, or, god forbid, pushed off, that was it! There were two ways to do that. The first option was to build the model four feet off the ground, making a realistic ravine that would have a character fall hundreds of feet (again, relatively). The other option was to create the illusion that it was far deeper than it seemed, which required fog. Now, at the time, the only way of generating fog I knew of was the classic dry ice approach, which turned out to be highly impractical. There are very few stores that have dry ice (solidified carbon dioxide) on hand, and it begins to sublimate ("melt" into air) soon after you remove it from the store's extreme deep freezer, meaning it would have to be acquired no more than about a day before the game.


The session was very fun to play. The encounter featured ravenous birds that tried to knock you into the ravine, the terror of which was heightened by the fog and the risk of instant death upon an unlucky saving throw. The next project Paul and I intend to undertake is the Manor House for the subsequent module, A Bann Too Many, which I'm looking forward to. Stay tuned to see how it turns out in the next few months.


You can also use the foam blocks they sell for fake flowers in either the craft department or garden center. I remember getting a 12x6x6 block for about $2-3 a year or two ago. Might be cheaper than the chicken wire/plaster cloth method. Plus you can use a utility knife or even a butter knife and pop out little chunks of it and get a nice texture for a mountain or cliffside.
ReplyDeleteVery nicely built! The multiple layers are great and the type of things that's hard to duplicate 2D.
ReplyDeleteTwitter: @BlackStarGames
This is just so awesome. I'll be tweeting this on the @DragonAgeOracle account as well. People really need to see the great job you did here.
ReplyDelete